---
title: Mount a LoRaWAN temperature sensor in a horizontal refrigerated display cabinet with static cooling
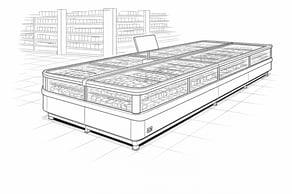
description: A guide for locating a temperature sensor in a refrigerated display and sales cabinet [counter] with a horizontal display opening in its upper part and accessible from above, equipped with a static cold-wall refrigeration system and no fans.
---
[Skip to content](https://support.aofrio.com/mount-a-temperature-sensor-in-a-horizontal-refrigerated-display-cabinet-with-static-cooling#main-content)
- [English](https://support.aofrio.com/mount-a-temperature-sensor-in-a-horizontal-refrigerated-display-cabinet-with-static-cooling)
- [Español - México](https://support.aofrio.com/es-mx/mount-a-temperature-sensor-in-a-horizontal-refrigerated-display-cabinet-with-static-cooling)
- [Português - Brasil](https://support.aofrio.com/pt-br/mount-a-temperature-sensor-in-a-horizontal-refrigerated-display-cabinet-with-static-cooling)
English
Show submenu for translations

Open main navigation
Close main navigation
- - [English](https://support.aofrio.com/mount-a-temperature-sensor-in-a-horizontal-refrigerated-display-cabinet-with-static-cooling)
- [Español - México](https://support.aofrio.com/es-mx/mount-a-temperature-sensor-in-a-horizontal-refrigerated-display-cabinet-with-static-cooling)
- [Português - Brasil](https://support.aofrio.com/pt-br/mount-a-temperature-sensor-in-a-horizontal-refrigerated-display-cabinet-with-static-cooling)
English
Show submenu for translations
- Contact us
Contact us
How can we help you?
- There are no suggestions because the search field is empty.
1. [Help Center](https://support.aofrio.com/?hsLang=en)
2. [Mounting & commissioning hardware](https://support.aofrio.com/mounting-commissioning-hardware?hsLang=en)
3. [Temperature sensors](https://support.aofrio.com/mounting-commissioning-hardware?hsLang=en#temperature-sensors)
October 2, 2026
# Mount a LoRaWAN temperature sensor in a horizontal refrigerated display cabinet with static cooling
## A guide for locating a temperature sensor in a refrigerated display and sales cabinet \[counter\] with a horizontal display opening in its upper part and accessible from above, equipped with a static cold-wall refrigeration system and no fans.
### Sensor activation prior to mounting
Because [LoRaWAN sensors](https://support.aofrio.com/lorawan-temperature-sensor-overview?hsLang=en) are powered off during shipment to comply with international shipping regulations, they need to be powered on and activated before mounting. This task is normally completed as part of quality assurance before the installation team receive the hardware.
1. Download the Milesight Toolbox app from the Google Play or the Apple store.
2. Open the Milesight Toolbox app on your mobile device and connect to the sensor with NFC to power it on. The app will display basic information and settings for the device if is recognized successfully.
3. Read and configure the device by tapping **Read/Write device** in the app.
NOTE: It’s not necessary to update the device password.
**Troubleshooting NFC setup**
If you have difficulty setting up the sensor, check:
- you are holding the mobile device close enough to the sensor while the app is turned on
- remove the mobile device if it is inside a case or pouch that may be blocking the signal
If the mobile device still fails to read/write configurations via NFC, try moving further back (eg several feet) and try scanning again.
---
### Mount the sensor
1. Unplug the cabinet to turn it off, being careful to follow any local safety and security rules.
2. ### 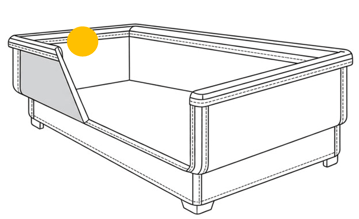
The sensor–plate assembly (sensor mounted using an adapter plate) must be installed on the inner side wall of the display unit corresponding to the compressor area (the stepped side), centered longitudinally and aligned with the gray plastic divider of the frame and the internal white metal sheet. Use the top edge of the plate as a reference to ensure correct positioning before fastening it. Detailed mounting instructions are provided separately.
3. Prepare the mounting locations by cleaning and drying the surface.
4. Make sure to use an adaptor plate to prevent damage to components within the cabinet walls.
- Mark two holes on the cabinet edge in a horizontal line.
- Drill screw holes according to the marks you have made.
- Attach adaptor plate and then sensor using aluminum pop rivet.
**Install Address?** The install address is essential for accurate geolocation tracking and a number of reporting filters. When a service technician starts an installation task, they are guided through the outlet setup workflow - which includes the outlet address and device configuration for both the LoRaWAN Gateway and sensors. This is managed within the Technician view of the [AoFrio iQ mobile app for Food Retail](https://support.aofrio.com/food-retail-app-software-overview-download?hsLang=en), not the Field app used for other AoFrio IoT hardware.
- [Support for your role](https://support.aofrio.com/support-for-your-role?hsLang=en#main-content)
- [Service technician](https://support.aofrio.com/support-for-your-role?hsLang=en#service-technician)
- [Hardware installer](https://support.aofrio.com/support-for-your-role?hsLang=en#hardware-installer)
- [OEM buyer or engineer](https://support.aofrio.com/support-for-your-role?hsLang=en#oem-buyer-or-engineer)
- [Fleet manager](https://support.aofrio.com/support-for-your-role?hsLang=en#fleet-manager)
- [Food Safety manager](https://support.aofrio.com/support-for-your-role?hsLang=en#food-safety-manager)
- [Your AoFrio account](https://support.aofrio.com/support-for-your-role?hsLang=en#your-aofrio-account)
- [Frequently Asked Questions (FAQ)](https://support.aofrio.com/support-for-your-role?hsLang=en#frequently-asked-questions-faq)
- [Identify & recover lost assets](https://support.aofrio.com/identify-recover-lost-assets?hsLang=en#main-content)
- [Asset protection](https://support.aofrio.com/identify-recover-lost-assets?hsLang=en#asset-protection)
- [Asset identification & tracking](https://support.aofrio.com/identify-recover-lost-assets?hsLang=en#asset-identification-tracking)
- [Software & Firmware releases](https://support.aofrio.com/software-firmware-releases?hsLang=en#main-content)
- [Release notifications](https://support.aofrio.com/software-firmware-releases?hsLang=en#release-notifications)
- [Firmware for IoT hardware](https://support.aofrio.com/software-firmware-releases?hsLang=en#firmware-for-iot-hardware)
- [About our software & platform](https://support.aofrio.com/about-our-software-platform?hsLang=en#main-content)
- [General](https://support.aofrio.com/about-our-software-platform?hsLang=en#general)
- [iQ platform](https://support.aofrio.com/about-our-software-platform?hsLang=en#iq-platform)
- [Field app](https://support.aofrio.com/about-our-software-platform?hsLang=en#field-app)
- [Track app](https://support.aofrio.com/about-our-software-platform?hsLang=en#track-app)
- [Food Retail](https://support.aofrio.com/about-our-software-platform?hsLang=en#food-retail)
- [User Manager](https://support.aofrio.com/about-our-software-platform?hsLang=en#user-manager)
- [Report app](https://support.aofrio.com/about-our-software-platform?hsLang=en#report-app)
- [Lab app](https://support.aofrio.com/about-our-software-platform?hsLang=en#lab-app)
- [OEM Dashboard](https://support.aofrio.com/about-our-software-platform?hsLang=en#oem-dashboard)
- [Cradle app](https://support.aofrio.com/about-our-software-platform?hsLang=en#cradle-app)
- [Universal Programmer app](https://support.aofrio.com/about-our-software-platform?hsLang=en#universal-programmer-app)
- [IoT hardware](https://support.aofrio.com/iot-hardware?hsLang=en#main-content)
- [IoT ecosystem](https://support.aofrio.com/iot-hardware?hsLang=en#iot-ecosystem)
- [Gateway - LTE Cat M1 & LTE Cat 1 BIS](https://support.aofrio.com/iot-hardware?hsLang=en#gateway-lte-cat-m1-lte-cat-1-bis)
- [SCS Controller - General information](https://support.aofrio.com/iot-hardware?hsLang=en#scs-controller-general-information)
- [SCS 800 Controller](https://support.aofrio.com/iot-hardware?hsLang=en#scs-800-controller)
- [SCS 500 & 600 Controller](https://support.aofrio.com/iot-hardware?hsLang=en#scs-500-600-controller)
- [Monitor](https://support.aofrio.com/iot-hardware?hsLang=en#monitor)
- [Network Pro](https://support.aofrio.com/iot-hardware?hsLang=en#network-pro)
- [Compact LoRaWAN Temperature Sensor](https://support.aofrio.com/iot-hardware?hsLang=en#compact-lorawan-temperature-sensor)
- [LoRaWAN Gateway](https://support.aofrio.com/iot-hardware?hsLang=en#lorawan-gateway)
- [Mounting & commissioning hardware](https://support.aofrio.com/mounting-commissioning-hardware?hsLang=en#main-content)
- [General](https://support.aofrio.com/mounting-commissioning-hardware?hsLang=en#general)
- [Gateway](https://support.aofrio.com/mounting-commissioning-hardware?hsLang=en#gateway)
- [SCS Controller](https://support.aofrio.com/mounting-commissioning-hardware?hsLang=en#scs-controller)
- [Motors & fans](https://support.aofrio.com/mounting-commissioning-hardware?hsLang=en#motors-fans)
- [Temperature sensors](https://support.aofrio.com/mounting-commissioning-hardware?hsLang=en#temperature-sensors)
- [Network Pro](https://support.aofrio.com/mounting-commissioning-hardware?hsLang=en#network-pro)
- [IoT hardware operation & behavior](https://support.aofrio.com/iot-hardware-operation-behavior?hsLang=en#main-content)
- [Cellular & Bluetooth connectivity](https://support.aofrio.com/iot-hardware-operation-behavior?hsLang=en#cellular-bluetooth-connectivity)
- [Optimize cooler performance & energy use](https://support.aofrio.com/iot-hardware-operation-behavior?hsLang=en#optimize-cooler-performance-energy-use)
- [SCS Controller](https://support.aofrio.com/iot-hardware-operation-behavior?hsLang=en#scs-controller)
- [SCS Controller - Parameters](https://support.aofrio.com/iot-hardware-operation-behavior?hsLang=en#scs-controller-parameters)
- [SCS Controller - Faults & Alarms](https://support.aofrio.com/iot-hardware-operation-behavior?hsLang=en#scs-controller-faults-alarms)
- [Monitor](https://support.aofrio.com/iot-hardware-operation-behavior?hsLang=en#monitor)
- [Gateway](https://support.aofrio.com/iot-hardware-operation-behavior?hsLang=en#gateway)
- [Network Pro](https://support.aofrio.com/iot-hardware-operation-behavior?hsLang=en#network-pro)
- [Motors & fans](https://support.aofrio.com/motors-fans?hsLang=en#main-content)
- [General](https://support.aofrio.com/motors-fans?hsLang=en#general)
- [ECR 2 26W motor](https://support.aofrio.com/motors-fans?hsLang=en#ecr-2-26w-motor)
- [ECR 2 13W motor](https://support.aofrio.com/motors-fans?hsLang=en#ecr-2-13w-motor)
- [ECR 1 motor](https://support.aofrio.com/motors-fans?hsLang=en#ecr-1-motor)
- [ECR 82/92 motor](https://support.aofrio.com/motors-fans?hsLang=en#ecr-82-92-motor)
- [Fan packs - 13W applications](https://support.aofrio.com/motors-fans?hsLang=en#fan-packs-13w-applications)
- [Fan packs - 26W applications](https://support.aofrio.com/motors-fans?hsLang=en#fan-packs-26w-applications)
- [Other fans](https://support.aofrio.com/motors-fans?hsLang=en#other-fans)
- [Manuals & datasheets](https://support.aofrio.com/manuals-datasheets?hsLang=en#main-content)
- [IoT hardware](https://support.aofrio.com/manuals-datasheets?hsLang=en#iot-hardware)
- [Motors and fans](https://support.aofrio.com/manuals-datasheets?hsLang=en#motors-and-fans)
- [Software](https://support.aofrio.com/manuals-datasheets?hsLang=en#software)
- [Special access resources](https://support.aofrio.com/special-access-resources?hsLang=en#main-content)
- [General](https://support.aofrio.com/special-access-resources?hsLang=en#general)
[](https://aofrio.com/)
78 Apollo Drive, Rosedale, Auckland 0632
New Zealand
Copyright © 2025, AoFrio Limited