
Before starting
-
Turn off and isolate the power supply.
NOTE: Never use an uninsulated screwdriver to remove the controller cover. Wiring includes Mains connection so always turn off and isolate the power supply before making wiring adjustments.
-
If using a Cradle, you may take some programming actions before mounting.
-
Decide the position and orientation you will mount the controller.
-
Avoid placing the controller where it will be exposed to condensation or dripping from above.
-
Ensure the controller is always mounted horizontally (as pictured below) with both rubber seals and End Cap attached (not shown). This will minimize the risk of water and dust ingress and improves communication with other devices and applications such as Gateway and Field app.
-
You may be able to mount the controller inside the cold chamber in certain cooler models – but check with your AoFrio representative before installing.
-
The maximum permitted mounting panel thickness is 9mm. Make sure there are no obstructions 7mm to the left and right of the hole, and 4mm above and below it to provide clearance with the Front Fascia
-
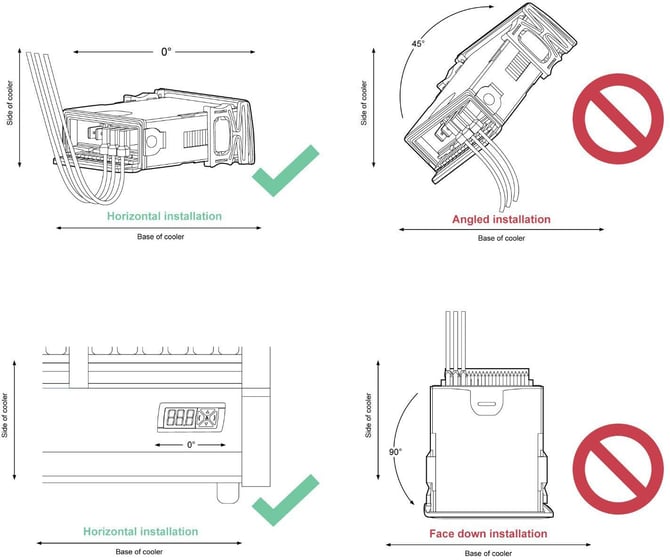
Full details are available in the product guide.
Mount the SCS Controller
-
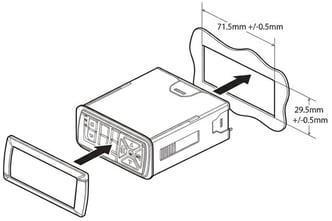 Prepare the mounting location on the cooler.
-
To clip on the Front Fascia Panel, cut a rectangular aperture in the Mounting Panel measuring 71.5mm wide by 29.5mm high. Insert the SCS Controller into the hole.
-
Remove any burrs or sharp edges around the aperture
-
-
Insert side clips.
-
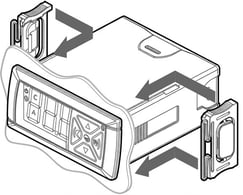 Insert the side clips into the slots on the side of the Controller body and slide these forwards until the controller is held securely against the mounting panel.
 -
To disengage the side clips, press the back half of the button pad inwards. Then slide the clips backwards.
-
-
Attach wiring harness.
-
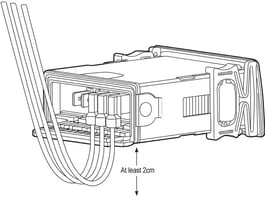 Refer to the Rear Connector Panel and Wiring recommendations in this section for detail about what to connect and where to connect.
 -
Attach all cables from sensors and hardware to the Controller connectors with a loop at least 2cm below the controller to encourage any moisture (that may gather outside the housing or on the wires) to run away from the Controller.
-
Check wiring size when you make the connections as this can impact the rear seal of the Controller.
-
-
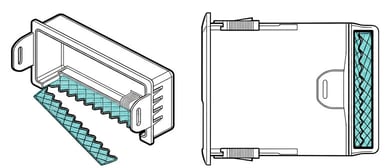
Insert the rubber cable seals.
-
After wiring, insert the two rubber cable seals or ‘grommets’ (highlighted blue in image) into the underside of the end cap and main housing.
-
-
Attach the rear cover.
Danger! Risk of electrocution!
-
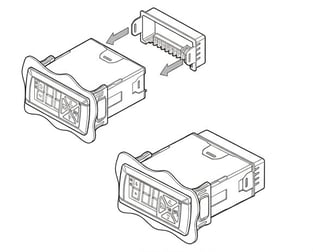 Slide the rear cover forwards and attach using the two outside clips.
 -
If removing the cover – always turn off and isolate the power supply beforehand, then gently disengage the two clips and slide the cover backwards.